Tuesday, January 21, 2014

Carrot Ginger Soup with Sriracha

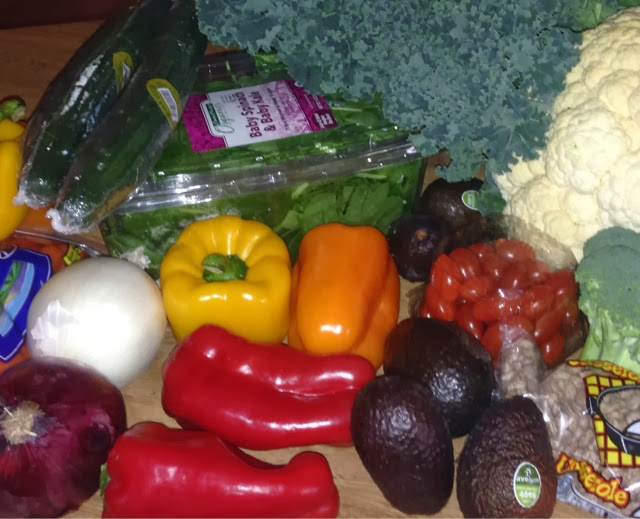
There are certain times of year that have a glorious overabundance of amazing "dirt candy." Farmers are meticulously sowing seeds and harvesting copious amounts of vibrant vegetables. This time of year in South Texas, you will find plenty of greens, broccoli, cauliflower, and some root vegetables, depending on when they were sown.
 
Although this picture is a little outdated (taken last year) it is a great representation of what my friend pulled out of our garden this weekend. I went by for a little bit to help on the greenhouse and they pulled out a humongous bucket of gnarly looking carrots. We had planted them last year but didn't spend any time on them, just let them go (no idea why, we just did). They were big, old, a little hairy, but DELICIOUS!
 

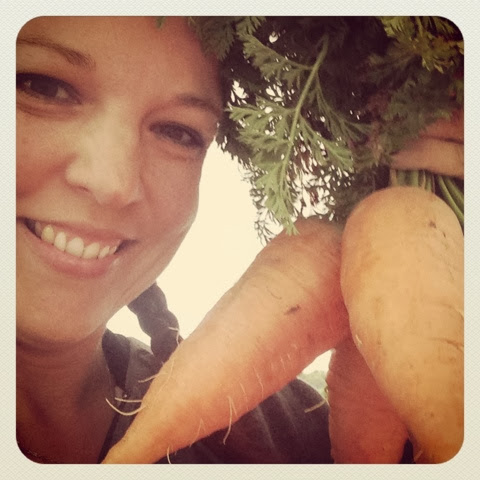
These carrots are from my friend Julie Braune's AMAZING farm in Geronimo TX.


With the abundance of carrots I found in my possession, I decided to cruise the web for a bit to get some ideas on what to do with them. Since they weren't really aesthetically pleasing to the eye, I decided to peel and chop them and make them into soup. And I am so glad I did. I kept the ingredients list to a bare minimum and seasoned it with salt and Sriracha, producing a creamy satisfying soup. I had a 2 cup serving and was stuffed! I love to eat, and I eat a LOT. Eating small portions usually doesn't cut it for me (I work out and run a lot) so when I can eat a large portion of something, feel full and know that I fueled my body with something that was not only delicious but healthy and nourishing, it's a win win.
 
A fun feature of using Sriracha to season is that it comes in a bottle with a writing tip! LOL you can personalize each bowl with cute and fun designs, making the dish more interesting. Don't worry about the heat, I had to use quite a bit of the Sriracha to make it spicy. The sweetness and mildness of the carrots and coconut milk really tame the heat down.
 
To make the soup:
5-6 large carrots, peeled and chopped
1/4 medium onion, chopped
1" ginger, peeled, smashed, and minced
2 t coconut oil (or olive oil) omit if oil free

3-4 c vegetable broth
1 can coconut milk

In a medium saucepan, heat coconut oil or EVOO or water/broth. Add onions and ginger and saute over medium heat for a few minutes, till the onions are translucent. Add carrots and vegetable broth and simmer till carrots are tender. You can choose to add some curry powder or paste, but I left it out this time. When carrots are tender, either use an immersion blender to blend till smooth or let cook a couple minutes and blend in the blender till smooth. Add coconut milk and season with salt. Pass the Sriracha when serving! Enjoy!

Monday, January 20, 2014

Build a Salad Workshop

If the truth must be known, I have to be in the mood for a salad. I also need to feel warm and not cold to enjoy it. That being said, here in South Texas lately, we've had a string of some gloriously beautiful days that have inspired me to create some unforgettable salads.

As you may have deducted from many of my previous posts, I am a big fan of kale. Make that a HUGE fan! I started out with the ever trusty massaged kale salad but have since changed my method ever so slightly.

For your build a salad workshop, you can use any greens you'd like. You can use the boxed kind (I like baby spinach and kale mix), lettuce, spinach, or KALE! If you haven't tried it before, I suggest you use it, just once, and see how you like it. You'll get more bang for your buck, nutritionally, and I find my kale salads to be heartier and more filling. Another plus with the kale is once you've prepared it, it stays in the fridge for a good while before spoiling.

When you prepare your kale, wash and dry the leaves then pull off the stems by grasping the stem end with one hand and pulling up on the leaf, away from the stem. This should keep your leaf intact, but if it tears and you get smaller pieces, that's fine. You can then tear your kale into bites sized pieces, but lately I've been stacking them and slicing into ribbons about 1/4-1/3" wide. This makes the massaging process a little shorter, in my opinion. Drizzle a couple teaspoons of olive oil and massage the kale for a couple of minutes. You could even cut it smaller, add the dressing straight to the kale, toss, and let sit in the fridge for an hour or more before proceeding.


This bowl contains about 8 - 10 big kale leaves, thinly sliced. I used curly leaf kale from the grocery store. Other available varieties are perfectly acceptable. My favorite is dinosaur aka Lacinato kale. It's a little harder to find but super easy to grow if you're into stuff like that. :)


I was so excited when I was making this salad that I forgot to take individual pictures of all the elements. The following picture does a good job of showing every ingredient. This is a GUIDE, folks, so feel free to add or subtract any of the ingredients.

 
When I go beyond making a standard salad (lettuce, cukes, peppers, dressing) I make sure to include many different elements that combine to make a full and satisfying meal that is jam packed with nutrients.
 
I like to include a grain of some kind. Quinoa is easy and delicious and stores well in the fridge for several days. I think quinoa tastes and cooks better if it has been soaked for at least 8 hours and rinsed very well. In fact, I like to rinse it 3-4 times before cooking to remove any residues on the seeds. If you do soak and rinse the quinoa before cooking, reduce the water by 25% (1 c dry before soaking quinoa plus 1 1/2 c water instead of 2 like the package suggests). You could use brown or wild rice or any other grain you like.
 
Next, I chop a variety of vegetables that tickle my fancy on that day. Since there have been good prices on peppers, cucumbers, and cauliflower, I used those. I love raw onions, so threw on a few slices of red onions. I don't think a salad is complete without avocados, so I always include one.
 
For dressing, the possibilities are endless! A beautiful combination of acidic liquid (vinegar, citrus juice), a bit of olive oil, a squirt of brown mustard for emulsifying, and some salt and pepper. I usually use 3 parts vinegar (balsamic, white wine, red wine, apple cider, or lemon or lime juice) with once part oil, 1/2 part mustard, and a dash of salt and pepper and garlic powder. Whisk it together or dump it all into a jar that has a cover and shake shake shake. If you find the dressing to be a little too tart, you can add a little maple syrup at a time until it tastes just right. In this particular salad, I used white wine vinegar.
 
Have these ingredients on hand. Keep them in containers in your fridge and you'll be able to assemble a salad at a moment's notice. Having the ingredients fresh and ready, you'll be more inclined to grab them rather than an unhealthy snack. How's that for fast food?

Thursday, January 9, 2014

Chipotle Remake

In my sweet little town, there are very few eating establishments that are primarily healthy (as opposed to mostly unhealthy with a few token salads). One of my favorite places to eat is Chipotle. I especially love how we can customize each dish exactly to our liking. My hubby and I usually get a rice and beans bowl to share and the servers are happy to put his meat on one end and a heap of guacamole on my side. We get full sharing one bowl!

While I love this meal at Chipotle, I wanted to duplicate it to serve at home to the whole family. As a home cook, I had EVERY single one of these ingredients on hand so I didn't have to go and purchase anything special for the meal. (I used to have a meal plan and shop specifically for it, but lately I just stock up on items that I know I'll use.)

Here we go - I'll talk you through the process and give you some tips and hints to make this easy.

**I made the rice and beans with no extra seasoning, only because I made a lot and wanted them to carry over to other recipes. The corn, pico de gallo, and sautéed peppers and onions provide PLENTY of flavor.

Brown rice - several years ago, I stumbled across a rice cooking method that ensured perfect brown rice, every single time, no burning, no dryness, just perfect fluffy rice. The trick? You cook it like pasta.

In a medium to large saucepan, bring about 1 1/2-2 quarts water to boil. When water boils, add a half pound of brown rice. When it returns to a boil, reduce heat a tiny bit, to medium high. Set your kitchen timer for 30 minutes and let it boil, uncovered. Check occasionally, and if the water evaporates too much and rice is on the surface, just add a bit more water. When 30 minutes is up, drain the rice in a colander, count to 8, add it back to the pan and cover it. Let it steam itself for 10 minutes and voila!! Perfect brown rice.
Black beans: I normally soak my beans overnight then use the pressure cooker. This time, I did the "quick soak method" on the package. Whatever your preferred method of cooking beans is, use it. Best results are always with a good, long, overnight soak, but that isn't the only way. Heck, you can even use canned beans for this recipe.
Corn salad, guacamole, and pico de gallo. I had frozen corn and cherry tomatoes on hand, so I used those. I usually buy 6-8 avocados at the grocery store every week, so I was covered there.

Corn Salad
1 bag frozen corn, thawed
1/3 red bell pepper, diced
2 T minced red onions
2 T finely chopped cilantro
juice of half a lime

(I made a small amount of pico de gallo, my kids don't usually eat it)

Pico De Gallo
1 c chopped tomatoes (cherry tomatoes cut into 4ths here)
1 jalapeno, diced (seeded if you are concerned about heat...I keep them)
1 T minced red onion
1 T finely chopped cilantro
juice of 1/4 lime

(you can prep all the veggies together ahead and divide them up for these dishes)

Guacamole

2 avocados, mashed
juice of 1/4 lime

For all dishes, season lightly with salt as desired.

Sautéed peppers and onions

1/2 large white onion, thinly sliced
1 green pepper, thinly sliced

In a non stick pan, coated very lightly with cooking spray or olive oil, or even a drizzle of water, sautee till you start seeing some GBD (golden brown delicious). Season with salt and pepper (for some reason, I love a generous dose of black pepper on these).


Chipotle uses Romaine lettuce, but I never keep that on hand. I had the bright idea of using cabbage and it worked perfect! Thinly slice 1/4 head of cabbage for this.
Salsa - you can use your favorite salsa recipe here. I took 6 dried arbol chiles and 2 cloves garlic, soaked them in hot water while I did other stuff. Then I stuck them in my NutriBullet with a can of fire roasted diced tomatoes and gave it a spin.
To serve, in order: rice, beans, sautéed peppers and onions, corn salad, pico de gallo, cabbage, guac, and salsa.
This is such a delicious, healthful meal. I know it seems like a lot of steps, but while your rice is cooking, you actually have 40 minutes on your hands, during which time you can do the rest of the food prep. This is a great, cheap way to feed your family and an awesome way to impress a crowd!
 
Enjoy!

Tuesday, January 7, 2014

Crazy for Veggies!

I have been a little quiet here on the blog lately, mainly because I've spent the last several weeks taking classes to become a real estate agent. Then there was Christmas "break" which SHOULD be a break but was still full of busyness. Anywho....

Yesterday I took my national and state real estate exams. Thankfully, I passed! Unfortunately, it was the most stressful test I've ever taken! I am usually a great test taker and love the challenge. I studied all afternoon Sunday and Monday morning, followed by completing the chapter reviews, which I did horribly on! That is where the stress ensued. Truth be told, I am still carrying stress in a couple places on my back, even though the test has been over for over 24 hours.

After the test, I went to the grocery store on the way home to pick up a few things that I didn't get to over the weekend. Everywhere I looked, piles of beautiful veggies were calling me. I swear, I got the craziest strongest cravings for all of these vegetables! You'd think I would have wanted a margarita or a really strong vodka drink after the stress that I felt, but no, I wanted KALE! And roasted veggies!
As I have mentioned before, my family still eats meat, so I roasted them two chicken breasts in the oven. I had my own oven rack, though, loaded with piles and piles of veggie goodness.
Look at those colors! Don't they just make you smile?
The caramelization, the golden brown delicious bits and pieces. Sigh.... I think I'm in love.
What's a veggie party without kale? I don't want to find out. So I made a bed of massaged kale salad to serve the amazing roasted veggies on.
 
The bonus about making roasted veggies is that my whole family devours them. Some of the kids prefer one or two veggies over the others but when all is said and done, the pan is empty, and everyone is full of nutrition!
 
So...how about a recipe? Here it is:
 
Roasted Vegetables
 
Preheat oven to 400 degrees. Line a large cookie sheet with your choice of lining (foil, parchment, or spray)
 
Cut your choice of vegetables into bite sized pieces. I used cauliflower, broccoli, onions, red, yellow, and orange bell peppers.
 
Throw them all into a large bowl and toss with a light drizzle of olive oil (appx 1 T) a good splash of balsamic vinegar (again, appx 1 T) some salt and pepper, a little dusting of garlic powder if desired. You see how loose this recipe is? Now just toss everything together until you think the oil, vinegar, and seasonings are evenly distributed. Spread out onto the pan and place in the oven. Check after 15 minutes, toss them around a bit to ensure even browning. I think this batch took about 35 minutes to cook, the same amount of time it took the chicken.
 
For the kale salad, I simply took about 6 large leaves of kale, pulled off the stems, and thinly sliced the leaves. I drizzled about 1 t of olive oil over top and massaged for a minute. I'm getting used to eating it without much of a massage. The smaller you cut it up, the better.
 
On the plate, I put a pile of the kale, a great heap of roasted veggies, a drizzle of some really good syrupy balsamic vinegar (I used the regular kind for roasting), and a side of avocado. This meal ranked up there with my favorites! I hope you enjoy it as much as I do.


Tuesday, December 17, 2013

Fantastic Five Layer Dip

The season for Holiday gatherings is upon us. If you are like me, the majority of your friends, families, and acquaintances don't share the same zeal for healthful, nutrient dense, plant based foods. You may hear questions like "What? No Meat?" or "Where's the cheese?" Or you may hear declarations such as "I could never eat like that." or "I love my meat, there's no way I could ever give that up."

I always find that if I introduce a dish as vegan, plant based, vegetarian, most of the above mentioned folks automatically decide that they won't like it. I decided to try a different angle this weekend at a pot luck BBQ for my daughter's basketball team.

I thought about it and decided to bring a healthful version of an all time party food favorite. Normally it's a seven layer dip with a layer of cheese and sour cream, but I omitted those two and piled on extra fresh goodness. I placed the dish on the table and didn't excuse it or introduce it as healthy or vegetarian. I walked away and watched it disappear! Everyone raved over it, which made my heart happy! Luckily someone brought a couple fruit trays, so with a nice generous helping of the five layer dip and a mound of fruit, I had a fantastic BBQ lunch.


Fantastic Five Layer Dip
 
You will need:
 
2 large cans fat free refried black beans (I think they were 1.5 lbs each)
3 medium tomatoes, chopped
2 limes
4 avocados, chopped
4 green onions, sliced all the way - white and green part
1 jalapeno
1 t garlic powder
1/2 t cumin
 
In a large bowl, combine the beans, juice of 1 1/2 limes, garlic powder, and cumin. Spread this mixture in the bottom of a glass 9x13 dish.
 
Toss the chopped avocados with the juice of 1/2 lime.
 
In order, layer the following ingredients evenly over the beans: tomatoes, avocados, green onions, cilantro.
 
Seed and chop the jalapenos. I like to sprinkle these over half the dish so that the spicy food lovers and the mild food lovers can both enjoy the dip. I like to identify the spicy side with half a jalapeno or a few slices that are visible because the chopped ones are camouflaged in the cilantro.
 
Serve with your favorite tortilla chips. In the spirit of keeping this healthy, try some organic sweet potato tortilla chips or multi seeded tortilla chips.
 
Enjoy and Shhh! Don't tell them it's vegan!
 
Mmm

Monday, December 9, 2013

Spicy Oven Roasted Cauliflower

Oh, mama.

It's hard to describe the sheer deliciousness of this dish.

I can, however, tell you that it makes this mother's heart happy to see her children devour every last morsel of a vegetable that isn't exactly famous for pleasing picky palates.

I've been seeing a few versions "Buffalo Cauliflower" floating around the internet lately, especially on Pinterest. I've clicked on several of them, but they all seem to have a considerable amount of butter or some other kind of fat in them. When I read reviews, one of the most common responses is something like this: "Looks good, but what about an oil free version?"

While I am not 100% oil free, I am working towards that goal, so I do look at all recipes now with a different perspective. Anything I recreate is going to have lesser amounts of oil. I will still use some, but it definitely won't have a major role in any dish I make. Actually, if you want to make my recipes, just omit the oil and you'll be fine.

One of my favorite pre-vegetarian meals was buffalo wings. I love the flavors, the spicy sauces and the sticky fingers. I DON'T miss the meat stuck in my teeth or the tummy aches that soon followed, not to mention the number of birds that went into that meal.

I made this recipe to be a delicious vegetable dish, and I struck from my mind the thought that this is supposed to be a substitute for Buffalo wings. I used an enormous head of cauliflower and roasted half the old fashioned way (I have a couple kids that don't like spiciness as much as I do) and the other half I made spicy for the Dannys and me. The spiciness of the Sriracha is a perfect combination with the creamy sweetness of the coconut milk, while the garlic gives it a tantalizing aroma that makes the whole house smell delicious. There isn't a single bite left behind! I served the family a little piece of chicken breast, salad, and a big mound of the cauliflower. For myself, I had just the salad with it. Two hours later, I still feel satisfied!
Spicy Oven Roasted Cauliflower
 
Preheat oven to 375
 
You will need:
1 large head of cauliflower, cut into bite sized pieces. Separate into two equal portions
1/3 c coconut milk
2-3 t Sriracha (or more to taste)
1 t garlic powder
salt and pepper to taste
 
In a large bowl, combine coconut milk, Sriracha, and garlic powder. Toss half of the cauliflower in the mixture till evenly coated. Spread on a large cookie sheet that has been lightly oiled, sprayed with non-stick spray, or covered in parchment paper.
 
You can either double this recipe or you can roast half of it tossed with a little bit of olive oil (1-2 T) plus seasoning of choice. I used salt and pepper and garlic powder. Spread this on a second cookie sheet.
 
Using two oven racks, place pans in oven. After 10 minutes, check on it. Give a little stir to ensure even browning. After another 5 minutes, see if it needs another stir and swap the pans on the racks. Check every 5 minutes or so and remove from oven when the cauli is GBD. I am sad to say that mine didn't make it to the golden part because my kids were salivating over the aroma of the roasting cauliflower and assuring me that they didn't need them to be GBD, they just wanted to eat it. They stood over the pan and ate a bunch of very hot cauliflower before it even had a chance to make it to their plates! I, on the other hand, sat down and savored every last bite. This is some good stuff!
 
Enjoy!

Black Bean Sweet Potato Enchilada Bake

You can tell when a Mexican restaurant is good by the way their enchilada sauce tastes. At least, that is the way I could tell, even though I never ate them. I did always take a bite of kids' enchiladas, though, and the enchilada sauce was always a good indicator of the quality of the food served there.

In the last year, as you can well imagine, I have eaten at very few restaurants. My favorite food is Mexican, but not all the MX restaurants in this area are vegetarian friendly. The ones that are, are definitely NOT vegan friendly. In fact, with a little questioning, I found that most sauces (even though dish is labeled vegetarian) are made with chicken or beef stock. Unfortunately, most places believe that lack of actual meat equals vegetarian. And let's not even address the cheese and sour cream issue!

OK, rant over. Here goes the recipe talk.

My little old Hispanic neighbor lady taught me how to make her special enchilada sauce when we moved in here about 12 years ago. Oh yes, it was a lovely sauce. Very tasty indeed. However, it wasn't lacking in fat, not at all! In fact, her sauce was appx 1/3 vegetable oil! It was fine back in the years when I didn't give much of a thought about what I was eating. I even tweaked the recipe with less oil and the use of bouillon and ground beef, as well as LOTS of cheese, but now there is no chance that I'd prepare that recipe for myself or my family. Seriously, it was delicious and I am not knocking her food, we've just become more conscientious eaters and choose to make better choices with what we eat.

A few weeks ago, a friend and I went on a little field trip to a neat little restaurant in a neighboring town. I ordered the black bean sweet potato enchilada stacks, which were ridiculously delicious. As with all dishes that I try and enjoy, I promptly start formulating a way to recreate them in my own kitchen.

While the restaurant version is a little saucier (I think the tortillas had a coating of oil that prevented the sauce from getting absorbed) I think I came pretty close. I also didn't use cheese or sour cream in mine, choosing to use avocados instead.

I did a little research online, comparing different recipes, and ended up creating my own version. Boy was it good! I will definitely make this again, and I am thinking it would be a fabulous dish to take to a pot luck. My meat eaters loved it, so I think it would be a hit in mixed company.

Black Bean Sweet Potato Enchilada Bake
 
Preheat oven to 375
 
For the enchiladas, you will need:
 
1 dozen corn tortillas (I used homemade, but any will do)
3 small to medium sweet potatoes, peeled, cubed, and cooked*
2 c black beans, drained
1/2 white onion, chopped
2 t olive oil
salt and pepper
 
*cook sweet potatoes any way you like. You can bake them first, then remove from skins and roughly chop. You can steam them for 10-15 minutes (I did that). Sautee in a little olive oil, or roast cubed potatoes in the oven.
 
In a large skillet, sautee the onions in olive oil till translucent. Set aside about a third of the sautéed onions for the sauce. Add cooked sweet potatoes and beans and stir together, lightly mashing everything together. You want it to be chucky but with enough of it mashed to hold things together. When your sauce is done, add about 1/4th cup of it to the mixture for added flavor and moisture.
 
For the sauce:
1 can fire roasted diced tomatoes
4-5 arbol chiles, soaked in a half cup boiling water
1/2 t garlic powder
1 t chili powder
1/2 t cumin
the onions that you set aside from the enchiladas
 
Put all sauce ingredients into a blender and let 'er rip on high for a couple of minutes. I don't usually go over 1 minute, but you can adjust the time according to the strength of your blender. I use a Nutribullet.
 
In a 9X13 baking dish sprayed with non stick spray or lightly oiled or lined with parchment paper (I use a pampered chef baking dish and don't need any spray because it's well seasoned), add about 1/3 of the enchilada sauce. Line the bottom of the dish with 6 tortillas. I place them down, one by one, and flip them so they are coated on both sides. Add the sweet potato and bean mixture. Dip the remaining tortillas in the sauce and place on top of the filling. Pour remainder of the sauce over the top, making sure to evenly coat everything and to get sauce down into the nooks and crannies.
 
Bake at 375 degrees for about 20 minutes, till heated through.
 
Serve with sliced avocados on top.
 
Confession, I added cheese to the 2/3's of the casserole that my family ate. I added just enough to say there was cheese. This quieted the "Is there meat in there?" questions with a "No, but there is cheese." "Ok."
 
Enjoy!
 
 
01 09 10